
2026.07.23 コラム
【テックコラム】Agent Identity auth manager の 3-legged OAuth を解説
DataCurrent の金子です。今回は、Agent Identity auth manager の 3-legged OAuth を解説します。
Agent Identity auth manager は、Agent Runtime 上のエージェントが外部サービスにアクセスするときの認証情報を扱う仕組みです。3-legged OAuth だけでなく、2-legged OAuth や API key のパターンもあります。
今回はその中でも 3-legged OAuth を扱います。3-legged OAuth では、ユーザー同意に基づいてエージェントがユーザーの権限で外部サービスへアクセスします。Auth Manager は、このときのリダイレクトや token の管理を担います。
今回は BigQuery MCP、Agent Runtime、Streamlit を使い、3-legged OAuth の仕組みと実装の勘所を紹介します。社内向けエージェントにユーザー権限の外部サービス連携を取り入れるときに、ADK エージェントとアプリの間で何をやり取りするのか、OAuth 後にどう処理を進めるのかを整理します。
なお、公式ドキュメントでは Agent Identity auth manager の 3-legged OAuth は Preview 機能です。Pre-GA 機能のため、仕様変更やサポート制限がある前提で検証しています。
※ この記事は、2026 年 7 月時点の Google Cloud の仕様に基づく内容です。
検証した構成
今回は Google の OAuth を使って、BigQuery MCP を利用してみます。
Agent Identity auth manager を使うため、ADK エージェントは Agent Runtime にデプロイします。Streamlit はローカルで起動し、チャット UI と OAuth callback の確認に使います。
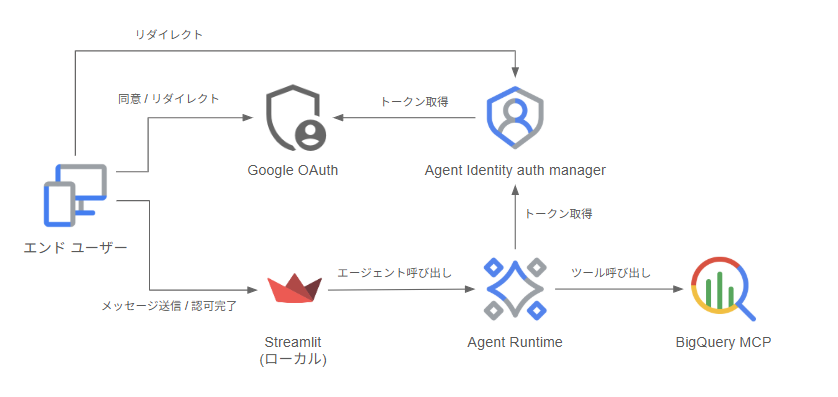
3-legged OAuth の仕組み
3-legged OAuth は、エンドユーザーの同意を使って外部サービスへアクセスする仕組みです。呼び出し先は MCP に限らず、OAuth で保護された外部サービスであれば同じ考え方になります。今回の検証では、その例として BigQuery MCP を使っています。
Auth Manager は、OAuth provider とのやり取り、token の取得、authorization の管理を担当します。authorization が保存済みであれば、エージェントは Auth Manager から credential を取得し、BigQuery MCP を呼び出します。
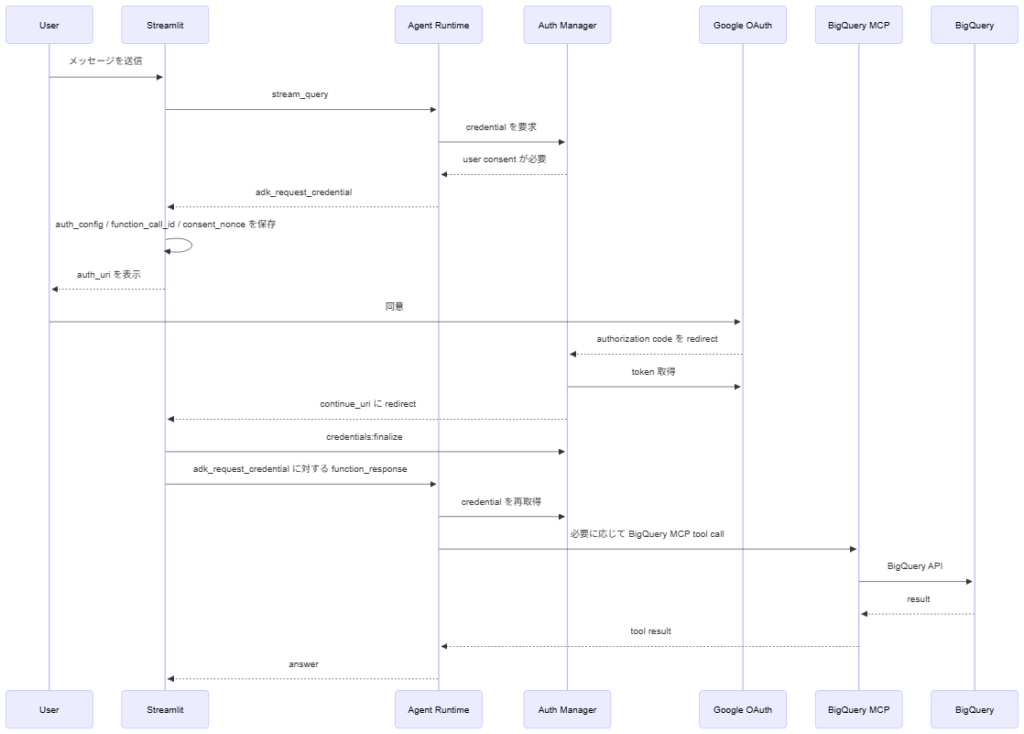
認可を取得するまでの流れは次の通りです。
- Agent Runtime が BigQuery MCP を呼び出す前に、Auth Manager へ credential を要求する
- Auth Manager が authorization の有無を確認し、なければ Agent Runtime は
adk_request_credentialの tool call を呼び出し元アプリケーション(今回は Streamlit)に返す
- アプリが
adk_request_credentialに含まれるauth_uriをユーザーに表示する
- ユーザー同意後、OAuth provider は Auth Manager の callback URL に authorization code を返す
- Auth Manager が authorization code を受け取り、token を取得したうえで、アプリの
continue_uriにリダイレクトする
- アプリが
credentials:finalizeを呼ぶ
- アプリが、2 で受け取った
adk_request_credentialの tool call に対応する tool response を Agent Runtime に返す
- Agent Runtime が credential を自動で再取得し、必要な BigQuery MCP の呼び出しに進む
シーケンスにすると次のようになります。
アプリ側で実装する処理
まず ADK エージェント側では、BigQuery MCP の tool に GcpAuthProviderScheme を設定します。ここで Auth Provider の resource name、必要な scope、認可後に戻す continue_uri を渡します。今回の Streamlit では continue_uri を http://localhost:8501 にしています。公式例のように /validateUserId 専用 endpoint を用意するのではなく、Streamlit の root URL で callback の query parameter を受け取ります。
bigquery_tools = McpToolset(
    connection_params=StreamableHTTPConnectionParams(
        url="https://bigquery.googleapis.com/mcp",
    ),
    auth_scheme=GcpAuthProviderScheme(
        name=AUTH_PROVIDER_NAME,
        scopes=["https://www.googleapis.com/auth/bigquery"],
        continue_uri="http://localhost:8501",
    ),
)
認可が必要になると、Agent Runtime からアプリへ adk_request_credential の tool call が返ります。 必要な部分だけ抜き出すと、次のような形です。
{
  "content": {
    "parts": [
      {
        "function_call": {
          "id": "{adk_request_credential の tool call ID}",
          "name": "adk_request_credential",
          "args": {
            "functionCallId": "{認可が必要になった元の tool call ID}",
            "authConfig": {
              "exchangedAuthCredential": {
                "oauth2": {
                  "authUri": "https://accounts.google.com/o/oauth2/v2/auth?...",
                  "nonce": "{consent nonce}"
                }
              }
            }
          }
        }
      }
    ]
  }
}
authUri は、OAuth 同意画面へ遷移するための URL です。OAuth client、redirect URI、scope、state などは含まれているので、アプリ側で URL を組み立てる必要はありません。アプリはこの URL をユーザーに表示し、同意画面を開いてもらいます。
この時点で、アプリ側で特定した user_id と、adk_request_credential の tool call に含まれていた nonce を同じセッションに保存しておきます。
ユーザーが同意すると、OAuth provider は Auth Manager の callback URL に authorization code を返します。Auth Manager はその code を受け取り、token の取得と保存を行ったうえで、最初に設定したアプリの continue_uri に戻します。この時点で token 自体は Auth Manager 側にあります。
次に、アプリは continue_uri で受けた callback をユーザー検証エンドポイントとして扱います。callback の user_id_validation_state と、保存しておいた user_id / nonce を使って、Auth Manager の credentials:finalize API にリクエストを送信します。ここで、同意結果をどのエンドユーザーに紐づけるかを確定します。
credentials:finalize のリクエストは次の形です。
POST https://iamconnectorcredentials.googleapis.com/v1alpha/projects/{project}/locations/{location}/connectors/{auth_provider}/credentials:finalize
Authorization: Bearer {app_access_token}
Content-Type: application/json

{
  "userId": "{アプリで特定したユーザー ID}",
  "userIdValidationState": "{callback の user_id_validation_state}",
  "consentNonce": "{adk_request_credential の nonce}"
}
最後に、アプリは adk_request_credential という tool call に対する tool response を Agent Runtime に返します。id には adk_request_credential の tool call ID を入れ、response には args.authConfig で受け取った値をそのまま返します。
{
  "role": "user",
  "parts": [
    {
      "function_response": {
        "id": "{adk_request_credential の tool call ID}",
        "name": "adk_request_credential",
        "response": "{adk_request_credential の args.authConfig}"
      }
    }
  ]
}
この構成のポイントは、アプリが access token を扱わなくてよいことです。ユーザー同意後は、一度 Auth Manager が authorization code を受け取り、token を取得して管理します。credential の取得や tool への注入は Google ADK が Auth Manager とやり取りして進めるため、アプリ側で OAuth code と token を交換したり、access token を保存したりする処理を実装する必要はありません。
これで、Agent Runtime が認可済みの credential を使える状態になり、BigQuery MCP の呼び出しに進めるようになります。
実装上の注意点
Auth Manager は、ADK で指定した user_id をもとにエンドユーザーの access token を取得します。そのため、実運用ではアプリのログインユーザーと ADK に渡す user_id を必ず対応させる必要があります。ここを固定値や自己申告の値にすると、別ユーザーの authorization を使ってしまうリスクがあります。
また、Auth Manager 側の authorization を消しても、Google OAuth 側で同じ OAuth client / scope に過去同意済みの場合、Google の同意画面が省略されることがあります。検証で同意画面を毎回見たい場合は、auth_uri に prompt=consent を付けるとよさそうです。
最後に
自社に専門人材がいない、リソースが足りない等の課題をお持ちの方に、エンジニア領域の支援サービス(Data Engineer Hub)をご提供しています。お困りごとがございましたら是非お気軽にご相談ください。
参考
- Agent Identity auth manager overview
- Authenticate using 3-legged OAuth with auth manager
- Create and deploy an agent
- ADK gcp_auth sample
付録
実行コマンド
まず環境変数を設定します。
export PROJECT_ID="YOUR_PROJECT_ID"
export LOCATION="asia-northeast1"
export AUTH_PROVIDER_ID="bigquery-mcp-3lo-authprovider"
export CLIENT_ID="YOUR_OAUTH_CLIENT_ID"
export CLIENT_SECRET="YOUR_OAUTH_CLIENT_SECRET"
Agent Identity Connector API を有効にします。
gcloud services enable iamconnectors.googleapis.com \
  --project="${PROJECT_ID}"
Google OAuth client の Authorized redirect URI には、Streamlit の URL ではなく、Auth Manager の callback URL を登録します。
https://iamconnectorcredentials.googleapis.com/v1/projects/${PROJECT_ID}/locations/${LOCATION}/connectors/${AUTH_PROVIDER_ID}/oauthcallback
Auth Provider を作成します。
gcloud alpha agent-identity connectors create "${AUTH_PROVIDER_ID}" \
  --project="${PROJECT_ID}" \
  --location="${LOCATION}" \
  --three-legged-oauth-client-id="${CLIENT_ID}" \
  --three-legged-oauth-client-secret="${CLIENT_SECRET}" \
  --three-legged-oauth-authorization-url="https://accounts.google.com/o/oauth2/v2/auth" \
  --three-legged-oauth-token-url="https://oauth2.googleapis.com/token"
作成後、Auth Provider が ENABLED になっていることと、redirectUrl を確認します。
gcloud alpha agent-identity connectors list \
  --project="${PROJECT_ID}" \
  --location="${LOCATION}"
ADK エージェントを Agent Runtime にデプロイします。
adk deploy agent_engine bigquery_mcp_agent \
  --project="${PROJECT_ID}" \
  --region="${LOCATION}" \
  --display_name="bigquery-mcp-3lo-agent"
Auth Provider を使うには権限付与が必要です。必要なロールは公式ドキュメントの Required roles にまとまっています。
Auth Provider に Agent Identity principal の権限を付与します。
gcloud alpha agent-identity connectors add-iam-policy-binding "${AUTH_PROVIDER_ID}" \
  --project="${PROJECT_ID}" \
  --location="${LOCATION}" \
  --role="roles/iamconnectors.user" \
  --member="principal://agents.global.org-ORGANIZATION_ID.system.id.goog/resources/aiplatform/projects/PROJECT_NUMBER/locations/${LOCATION}/reasoningEngines/ENGINE_ID"
ローカル検証で Auth Provider を使うユーザーにも roles/iamconnectors.user を付与します。
gcloud alpha agent-identity connectors add-iam-policy-binding "${AUTH_PROVIDER_ID}" \
  --project="${PROJECT_ID}" \
  --location="${LOCATION}" \
  --role="roles/iamconnectors.user" \
  --member="user:YOUR_EMAIL@example.com"
.env を設定します。
GOOGLE_CLOUD_PROJECT=YOUR_PROJECT_ID
GOOGLE_CLOUD_LOCATION=asia-northeast1
AGENT_ENGINE_NAME=projects/YOUR_PROJECT_NUMBER/locations/asia-northeast1/reasoningEngines/YOUR_ENGINE_ID
AUTH_PROVIDER_NAME=projects/YOUR_PROJECT_ID/locations/asia-northeast1/connectors/bigquery-mcp-3lo-authprovider
CONTINUE_URI=http://localhost:8501
検証中に初回の認可フローをやり直したい場合だけ、Auth Manager の authorization を revoke します。
gcloud alpha agent-identity connectors revoke-authorization "${AUTH_PROVIDER_ID}" \
  --project="${PROJECT_ID}" \
  --location="${LOCATION}" \
  --user-id="YOUR_USER_ID"
Agent Runtime にデプロイする ADK エージェント
import os

from google.adk.agents import Agent
from google.adk.auth.credential_manager import CredentialManager
from google.adk.integrations.agent_identity import GcpAuthProvider
from google.adk.integrations.agent_identity import GcpAuthProviderScheme
from google.adk.tools.mcp_tool.mcp_session_manager import (
    StreamableHTTPConnectionParams,
)
from google.adk.tools.mcp_tool.mcp_toolset import McpToolset

CredentialManager.register_auth_provider(GcpAuthProvider())

AUTH_PROVIDER_NAME = os.environ["AUTH_PROVIDER_NAME"]
CONTINUE_URI = os.environ.get("CONTINUE_URI", "http://localhost:8501")
BIGQUERY_MCP_ENDPOINT = os.environ.get(
    "BIGQUERY_MCP_ENDPOINT", "https://bigquery.googleapis.com/mcp"
)

bigquery_tools = McpToolset(
    connection_params=StreamableHTTPConnectionParams(
        url=BIGQUERY_MCP_ENDPOINT
    ),
    auth_scheme=GcpAuthProviderScheme(
        name=AUTH_PROVIDER_NAME,
        scopes=["https://www.googleapis.com/auth/bigquery"],
        continue_uri=CONTINUE_URI,
    ),
)

root_agent = Agent(
    model="gemini-3.5-flash",
    name="bigquery_mcp_agent",
    description="Agent Identity を使って BigQuery MCP を呼び出すアシスタントです。",
    instruction=(
        "あなたは BigQuery のアシスタントです。ユーザーが BigQuery リソースについて"
        "質問した場合は BigQuery MCP tool を使い、簡潔に回答してください。"
    ),
    tools=[bigquery_tools],
)
Agent Identity を有効にするため、.agent_engine_config.json に次を置きます。
{ "identity_type": "AGENT_IDENTITY" }
Streamlit のコード
import json
import os
from pathlib import Path
from urllib.parse import parse_qsl, urlencode, urlsplit, urlunsplit

import google.auth
import httpx
import streamlit as st
import vertexai
from dotenv import load_dotenv
from google.adk.auth import AuthConfig
from google.auth.transport.requests import Request
from vertexai import agent_engines

ROOT = Path(__file__).parent
STATE_FILE = ROOT / ".auth_state.json"
FINALIZE_URL = "https://iamconnectorcredentials.googleapis.com/v1alpha/{}/credentials:finalize"

load_dotenv(ROOT / ".env")
PROJECT_ID = os.environ["GOOGLE_CLOUD_PROJECT"]
LOCATION = os.getenv("GOOGLE_CLOUD_LOCATION", "asia-northeast1")
AGENT_ENGINE_NAME = os.environ["AGENT_ENGINE_NAME"]
AUTH_PROVIDER_NAME = os.environ["AUTH_PROVIDER_NAME"]
AUTH_KEYS = ["auth_config", "function_call_id", "consent_nonce", "auth_uri", "finalized"]


@st.cache_resource
def agent():
    vertexai.init(project=PROJECT_ID, location=LOCATION)
    return agent_engines.get(AGENT_ENGINE_NAME)


def load_state():
    if STATE_FILE.exists():
        for key, value in json.loads(STATE_FILE.read_text(encoding="utf-8")).items():
            if key == "user_id" and key in st.session_state:
                continue
            st.session_state[key] = value


def save_state():
    keys = ["user_id", "session_id", "auth_config", "function_call_id", "consent_nonce", "auth_uri"]
    STATE_FILE.write_text(json.dumps({k: st.session_state[k] for k in keys}), encoding="utf-8")


def clear_auth_state():
    STATE_FILE.unlink(missing_ok=True)
    for key in AUTH_KEYS:
        st.session_state.pop(key, None)


def force_consent(auth_uri):
    parts = urlsplit(auth_uri)
    query = dict(parse_qsl(parts.query, keep_blank_values=True))
    query["prompt"] = "consent"
    return urlunsplit((parts.scheme, parts.netloc, parts.path, urlencode(query), parts.fragment))


def find_auth_request(event):
    for part in (event.get("content") or {}).get("parts") or []:
        function_call = part.get("function_call") or part.get("functionCall")
        if function_call and function_call.get("name") == "adk_request_credential":
            args = function_call.get("args") or {}
            return function_call.get("id"), args.get("authConfig") or args.get("auth_config")
    return None, None


def run_agent(message):
    events = []
    for event in agent().stream_query(
        message=message,
        user_id=st.session_state.user_id,
        session_id=st.session_state.session_id,
    ):
        event = event if isinstance(event, dict) else event.model_dump(mode="json", exclude_none=True)
        events.append(event)

        function_call_id, auth_config = find_auth_request(event)
        if not auth_config:
            continue

        oauth2 = AuthConfig.model_validate(auth_config).exchanged_auth_credential.oauth2
        st.session_state.function_call_id = function_call_id
        st.session_state.auth_config = auth_config
        st.session_state.auth_uri = force_consent(oauth2.auth_uri)
        st.session_state.consent_nonce = oauth2.nonce
        save_state()
        break

    st.session_state.events = events


def finalize_credentials():
    validation_state = st.query_params.get("user_id_validation_state")
    if not validation_state:
        return

    load_state()
    credentials, _ = google.auth.default(scopes=["https://www.googleapis.com/auth/cloud-platform"])
    credentials.refresh(Request())
    auth_provider_name = st.query_params.get("connector_name") or st.query_params.get("auth_provider_name") or AUTH_PROVIDER_NAME
    response = httpx.post(
        FINALIZE_URL.format(auth_provider_name),
        headers={"Authorization": f"Bearer {credentials.token}"},
        json={
            "userId": st.session_state.user_id,
            "userIdValidationState": validation_state,
            "consentNonce": st.session_state.consent_nonce,
        },
        timeout=30,
    )
    response.raise_for_status()

    STATE_FILE.unlink(missing_ok=True)
    st.session_state.pop("auth_uri", None)
    st.session_state.finalized = True
    st.query_params.clear()


def resume_agent():
    message = {
        "role": "user",
        "parts": [{
            "function_response": {
                "id": st.session_state.function_call_id,
                "name": "adk_request_credential",
                "response": st.session_state.auth_config,
            }
        }],
    }
    st.session_state.pop("finalized", None)
    clear_auth_state()
    run_agent(message)
    st.rerun()


st.title("BigQuery MCP 3LO 検証")
load_state()

if not st.session_state.get("user_id"):
    # ローカル検証用。本番では、アプリ側の認証済みユーザーから user_id を決めます。
    user_id = st.text_input("User ID")
    if st.button("決定"):
        clear_auth_state()
        st.session_state.user_id = user_id.strip()
        st.session_state.pop("session_id", None)
        st.session_state.pop("events", None)
        st.rerun()
    st.stop()

if "session_id" not in st.session_state:
    st.session_state.session_id = agent().create_session(user_id=st.session_state.user_id)["id"]

finalize_credentials()

if prompt := st.chat_input("BigQuery について質問する"):
    run_agent(prompt)

if st.session_state.get("auth_uri"):
    st.markdown(f'<a href="{st.session_state.auth_uri}" target="_self">同意画面を開く</a>', unsafe_allow_html=True)

if st.session_state.get("finalized") and st.button("エージェントを再開"):
    resume_agent()

for event in st.session_state.get("events", []):
    for part in (event.get("content") or {}).get("parts") or []:
        if text := part.get("text"):
            st.chat_message("assistant").write(text)
本件に関するお問い合わせは下記にて承ります。
株式会社DataCurrent
info@datacurrent.co.jp